Introduction
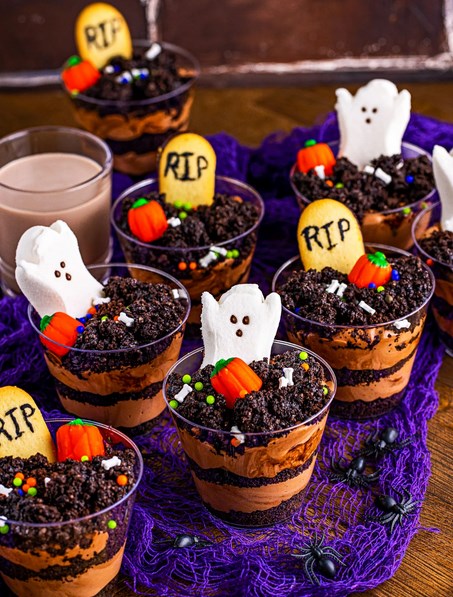
Halloween desserts are all about combining spooky fun with irresistible flavors—and Haunted Graveyard Dirt Pudding Cups with Cookie Tombstones do just that. These layered treats feature chocolate pudding, crushed cookies that resemble dirt, and playful decorations like cookie tombstones, gummy worms, and candy pumpkins.
This recipe is a creative twist on the classic “dirt pudding,” but with a creepy Halloween makeover. Each cup looks like a tiny haunted graveyard, complete with edible tombstones and wriggly gummy worms crawling out of the “soil.” It’s a dessert that makes kids giggle, adults smile, and everyone ask for seconds.
Why I Love This Recipe
- No-Bake & Easy: Perfect for busy Halloween nights—ready in under 30 minutes.
- Fun to Decorate: Kids and adults alike love decorating their own graveyard cups.
- Customizable: You can switch up the pudding flavors, toppings, or candies.
- Looks Spooky, Tastes Heavenly: Despite its creepy appearance, it’s creamy, chocolatey, and indulgent.
Why This is a Must-Try Dish
This is a must-try Halloween dessert because it’s:
- Festive: Looks like a spooky graveyard scene.
- Crowd-Pleaser: Loved by kids and adults alike.
- Make-Ahead Friendly: Can be prepared in advance for parties.
- Budget-Friendly: Simple ingredients, big impact!
Preparation & Cooking Time
- Preparation Time: 20 minutes
- Cooking Time: 0 minutes (no-bake)
- Total Time: ~20 minutes
Servings & Nutrition
- Servings: 8 pudding cups
- Calories (per serving): ~300 kcal
(Calories vary depending on pudding mix and toppings.)
Course & Cuisine
- Course: Dessert
- Cuisine: American, Holiday-Themed (Halloween)
Ingredients
For the Pudding Base:
- 2 boxes (3.9 oz each) instant chocolate pudding mix
- 4 cups cold milk
- 1 tub (8 oz) whipped topping (Cool Whip), thawed
- 1 package (14 oz) chocolate sandwich cookies (Oreos), crushed
For the Decorations:
- 8 rectangular cookies (like Milano, Biscoff, or shortbread) for tombstones
- Black gel icing (to write “RIP” on tombstones)
- Gummy worms
- Candy pumpkins, candy bones, or Halloween sprinkles (optional)
Directions (Quick Overview)
- Make pudding and fold in whipped topping.
- Crush cookies for “dirt.”
- Layer pudding and cookie crumbs in cups.
- Add cookie tombstones and candies to decorate.
Step-by-Step Preparation Method
Step 1: Make the Pudding Mixture
- In a large mixing bowl, whisk together pudding mixes and cold milk for 2 minutes.
- Let set for 5 minutes to thicken.
- Fold in whipped topping until creamy and smooth.
Step 2: Prepare the Cookie Dirt
- Place chocolate cookies in a food processor or zip-top bag.
- Crush into fine crumbs that resemble dirt.
Step 3: Assemble the Graveyard Cups
- Spoon pudding mixture into clear cups, filling halfway.
- Add a layer of cookie crumbs.
- Spoon more pudding on top, then finish with another thick layer of cookie crumbs.
Step 4: Decorate the Cups
- Write “RIP” or spooky designs on rectangular cookies using black gel icing.
- Stick one cookie into each cup as a tombstone.
- Add gummy worms, candy pumpkins, or sprinkles around the “graveyard.”
How to Serve
- Serve in clear plastic cups to show the dirt layers.
- Place on a Halloween-themed platter with fake cobwebs or skeleton hands.
- Perfect for Halloween parties, classroom treats, or family dessert nights.
Recipe Tips
- Use clear cups for the best spooky effect.
- Make pudding in advance, but add decorations right before serving to keep cookies crisp.
- For extra creepiness, drizzle red gel icing as “blood” around the tombstones.
- If making for adults, you can spike pudding with a splash of Baileys or Kahlúa for a boozy version.
Variations
- Pumpkin Patch Cups: Use vanilla pudding tinted orange and top with candy pumpkins.
- Monster Graveyards: Add candy eyeballs peeking out of the dirt.
- Spider Web Topping: Pipe white icing in a web pattern on top before decorating.
- Gluten-Free: Use gluten-free chocolate cookies for the “dirt.”
- Vegan: Use dairy-free pudding, whipped topping, and cookies.
Freezing & Storage
- Storage: Keep assembled cups in the refrigerator for up to 2 days.
- Make-Ahead: Pudding and cookie crumbs can be prepared 1 day ahead; decorate just before serving.
- Freezing: Not recommended, as pudding and whipped topping don’t thaw well.
Special Equipment Needed
- Mixing bowls & whisk
- Food processor or rolling pin (for crushing cookies)
- Piping bag or small tube (for writing on tombstones)
- Clear serving cups
Conclusion
Haunted Graveyard Dirt Pudding Cups with Cookie Tombstones are the ultimate Halloween dessert: creepy, fun, and delicious. With their layers of chocolatey goodness, crushed cookie dirt, and playful edible decorations, they’re guaranteed to be the star of any Halloween table.
They’re quick to prepare, endlessly customizable, and loved by all ages. Whether you’re throwing a spooky bash, sending treats to school, or just making a fun family dessert, these pudding cups are sure to cast a sweet spell on everyone.

Haunted Graveyard Dirt Pudding Cups with Cookie Tombstones
Description
Halloween desserts are all about combining spooky fun with irresistible flavors—and Haunted Graveyard Dirt Pudding Cups with Cookie Tombstones do just that.
Ingredients
For the Pudding Base:
For the Decorations:
Instructions
-
Step 1: Make the Pudding Mixture: In a large mixing bowl, whisk together pudding mixes and cold milk for 2 minutes. Let set for 5 minutes to thicken. Fold in whipped topping until creamy and smooth.
-
Step 2: Prepare the Cookie Dirt: Place chocolate cookies in a food processor or zip-top bag. Crush into fine crumbs that resemble dirt.
-
Step 3: Assemble the Graveyard Cups: Spoon pudding mixture into clear cups, filling halfway. Add a layer of cookie crumbs. Spoon more pudding on top, then finish with another thick layer of cookie crumbs.
-
Step 4: Decorate the Cups: Write “RIP” or spooky designs on rectangular cookies using black gel icing. Stick one cookie into each cup as a tombstone. Add gummy worms, candy pumpkins, or sprinkles around the “graveyard.”