Introduction
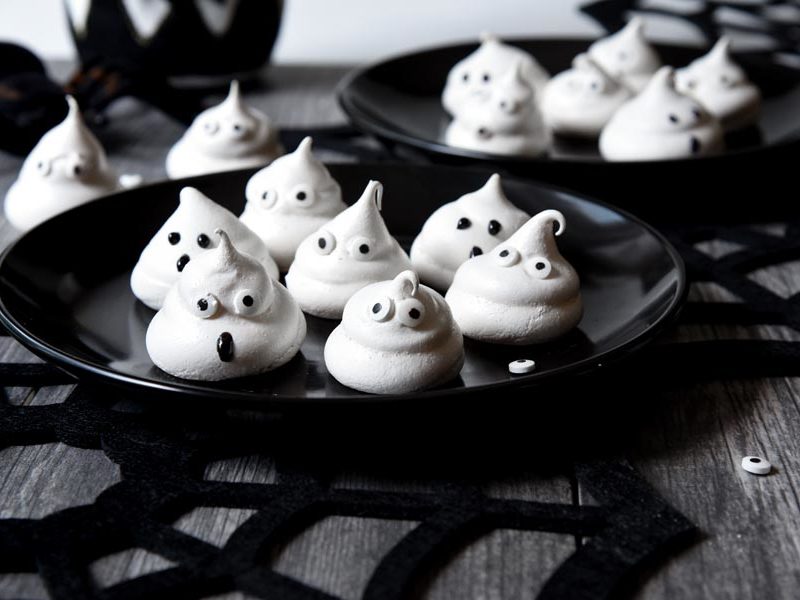
Halloween is the perfect time to get creative with desserts, and nothing says spooky-sweet like Ghost Meringue Cookies with Chocolate Eyes. These adorable little treats are made from whipped egg whites, sugar, and a touch of vanilla, baked until crisp on the outside and soft in the center. Each one is shaped like a tiny ghost and decorated with chocolate eyes that bring them to life.
They’re light, airy, and fun to make—perfect for Halloween parties, classroom treats, or even as a spooky after-dinner dessert. Plus, their whimsical appearance makes them look like something straight out of a haunted bakery!
Why I Love This Recipe
- Light & Sweet: They’re crispy, delicate, and not overly heavy, making them a refreshing alternative to rich Halloween desserts.
- Kid-Friendly: Fun to make with children—especially when piping little ghost shapes and dotting chocolate eyes.
- Make-Ahead Friendly: Store well for days, so you can prepare them in advance of your party.
- Adorable Presentation: They’re so cute that guests hesitate before biting into them!
Why This is a Must-Try Dish
This is a must-try Halloween recipe because it’s:
- Visually Striking: A platter of tiny edible ghosts instantly sets a festive mood.
- Simple Ingredients: Made with pantry staples like eggs and sugar.
- Naturally Gluten-Free: Great option for party guests with dietary restrictions.
- Customizable: Add flavors, colors, or decorations to suit your spooky style.
Preparation & Cooking Time
- Preparation Time: 15 minutes
- Cooking Time: 1 hour – 1 hour 15 minutes (plus cooling)
- Total Time: ~1 hour 30 minutes
Servings & Nutrition
- Servings: About 20–24 ghost cookies
- Calories (per cookie): ~35 kcal
(Calories may vary depending on size and chocolate used.)
Course & Cuisine
- Course: Dessert / Snack
- Cuisine: European-inspired, Holiday (Halloween)
Ingredients
For the Meringues:
- 4 large egg whites, room temperature
- 1 cup granulated sugar
- ¼ teaspoon cream of tartar (or 1 teaspoon lemon juice)
- 1 teaspoon vanilla extract
For Decoration:
- 2–3 tablespoons melted chocolate (dark, semi-sweet, or milk)
- OR mini chocolate chips for eyes
Directions (Quick Overview)
- Whip egg whites with cream of tartar until foamy.
- Slowly add sugar, whipping until stiff glossy peaks form.
- Pipe ghost shapes onto a baking sheet.
- Bake low and slow until dry and crisp.
- Add chocolate eyes once cooled.
Step-by-Step Preparation Method
Step 1: Prepare Equipment
- Preheat oven to 225°F (110°C).
- Line 2 baking sheets with parchment paper.
- Fit a piping bag with a large round tip (or cut the tip off a zip-top bag).
Step 2: Make the Meringue
- In a clean, dry mixing bowl, beat egg whites with cream of tartar until foamy.
- Gradually add sugar, 1 tablespoon at a time, while continuing to beat.
- Beat until the mixture is thick, glossy, and forms stiff peaks.
- Gently fold in vanilla extract.
Step 3: Pipe the Ghosts
- Transfer meringue to the piping bag.
- Pipe tall swirls onto parchment-lined baking sheets to resemble ghost shapes.
- Leave a little space between each cookie.
Step 4: Bake the Meringues
- Bake for 60–75 minutes, until dry and firm to the touch.
- Turn off oven, crack the door slightly, and let cookies cool completely inside to avoid cracking.
Step 5: Add Ghostly Eyes
- Once cooled, use a toothpick to dot melted chocolate onto each ghost for eyes (and a mouth if desired).
- Alternatively, press in mini chocolate chips while meringue is still slightly warm.
How to Serve
- Arrange on a spooky platter with fake cobwebs or pumpkins for a haunting display.
- Serve with hot chocolate, coffee, or cider at Halloween parties.
- Use as edible cupcake toppers for a festive touch.
Recipe Tips
- Ensure mixing bowl and whisk are completely grease-free, or meringues won’t whip properly.
- Add sugar slowly to avoid collapsing the meringue.
- Bake on low heat—higher heat will brown the meringues.
- Let them cool in the oven to prevent cracks.
Variations
- Colored Ghosts: Add a drop of food coloring for pastel or neon ghosts.
- Spooky Flavors: Mix in peppermint, almond, or pumpkin spice extract instead of vanilla.
- Bloody Ghosts: Drizzle red food gel or strawberry syrup for a “scary” effect.
- Mini Ghosts: Pipe bite-sized versions for party favors.
- Snowy Christmas Ghosts: Repurpose the recipe for winter by dusting with edible glitter.
Freezing & Storage
- Storage: Keep in an airtight container at room temperature for up to 1 week.
- Freezing: Not recommended, as meringues can absorb moisture and become sticky.
- Tip: Store with a packet of food-safe silica gel or uncooked rice to absorb moisture.
Special Equipment Needed
- Electric mixer (hand or stand)
- Mixing bowl (glass or metal, not plastic)
- Piping bag with large round tip (or zip-top bag)
- Baking sheets with parchment paper
Conclusion
Ghost Meringue Cookies with Chocolate Eyes are the ultimate Halloween treat: airy, crisp, and hauntingly adorable. They’re simple yet impressive, made with just a few pantry staples, and guaranteed to make guests smile at any spooky gathering.
Whether served on their own, added to a dessert table, or used as edible decorations, these little ghosts will haunt your Halloween in the sweetest way possible.

Ghost Meringue Cookies with Chocolate Eyes
Description
Halloween is the perfect time to get creative with desserts, and nothing says spooky-sweet like Ghost Meringue Cookies with Chocolate Eyes. These adorable little treats are made from whipped egg whites, sugar, and a touch of vanilla, baked until crisp on the outside and soft in the center.
Ingredients
For the Meringues:
For Decoration:
Instructions
-
Step 1: Prepare Equipment: Preheat oven to 225°F (110°C). Line 2 baking sheets with parchment paper. Fit a piping bag with a large round tip (or cut the tip off a zip-top bag).
-
Step 2: Make the Meringue: In a clean, dry mixing bowl, beat egg whites with cream of tartar until foamy. Gradually add sugar, 1 tablespoon at a time, while continuing to beat. Beat until the mixture is thick, glossy, and forms stiff peaks.Gently fold in vanilla extract.
-
Step 3: Pipe the Ghosts: Transfer meringue to the piping bag. Pipe tall swirls onto parchment-lined baking sheets to resemble ghost shapes. Leave a little space between each cookie.
-
Step 4: Bake the Meringues: Bake for 60–75 minutes, until dry and firm to the touch. Turn off oven, crack the door slightly, and let cookies cool completely inside to avoid cracking.
-
Step 5: Add Ghostly Eyes: Once cooled, use a toothpick to dot melted chocolate onto each ghost for eyes (and a mouth if desired). Alternatively, press in mini chocolate chips while meringue is still slightly warm.